In Raj’s latest xdrive photo lesson he continues the discussion of setting the camera to raw by comparing the differences of raw and jpg images that are produced within the camera at the exact moment with the same camera settings.
Below you will see comparison of a raw image of apples and their reflections edited in Capture One with the exact jpg images created within the Nikon D750. I chose to have the aperture set at f/1.8 as a means to expand my understanding of the complexities of focal plane, sharpness, depth of field, and aperture settings. There were a series of images created using manual focus that were discarded as the sharpness and detail were a bit fuzzy.
I generally photograph with the camera set to raw with a black and white setting as a means to encourage a greater awareness of the range of white to black. When the raw images are transferred to Capture One for raw editing they are in color.
- Edited raw image after contrast, white balance, saturation, light and shadow, structure, clarity, sharpness, exposure, and crop adjustments.
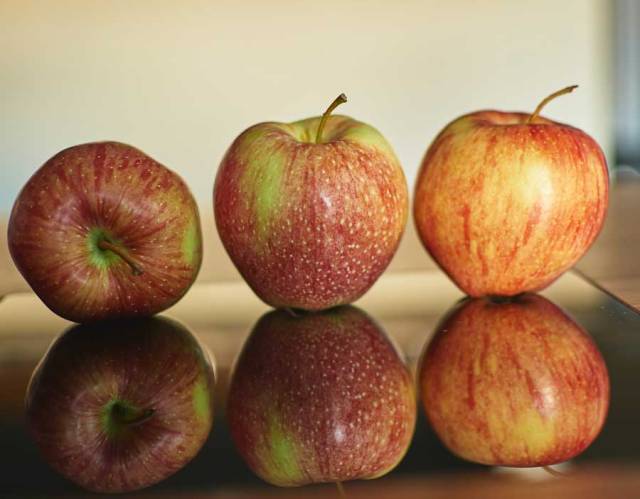
Nikon D750 f1.8 1.3s 35 mm ISO 100
2. When I opened up the jpg images from the Nikon, I found that they remained in black and white; therefore, I went back into Capture One and created a black and white version of the above image to use as a comparison to the Nikon’s jpg.
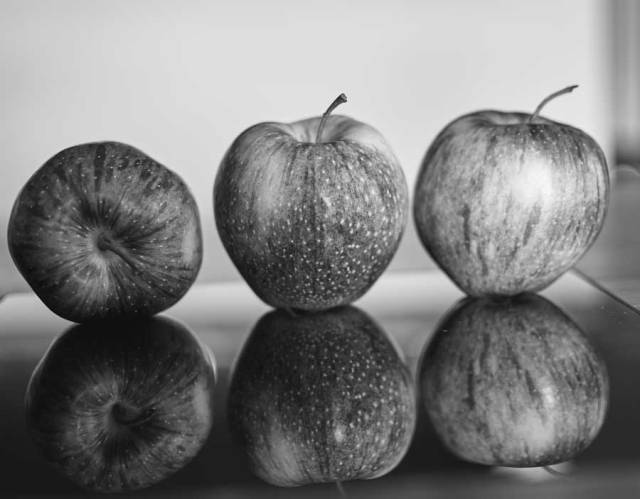
Nikon D750 f1.8 1.3s 35 mm ISO 100
The Nikon jpg image below seems to keep the reflected apples in greater shadow. Also the variations of the texture and appearance of the apples and their reflections are less apparent than in the image above.
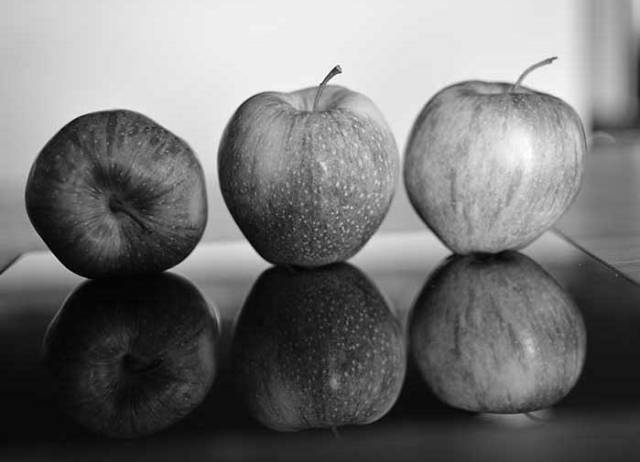
Nikon D750 f1.8 1.3s 35 mm ISO 100 JPG
A cropped comparison of one apple and its shadow.


At the beginning of this project, I found myself acknowledging a need for a basic understanding of editing pros and cons; for example, it is very easy for me to over sharpen images that result in haloes.
In closing, I’m also including two additional apple images in which I moved the camera closer as part of my open aperture setting and focal plane study.

Nikon D750 f/1.8 1.3s 35mm ISO 100

Nikon D750 f/1.8 0.4s 35mm ISO 100
The right apple and it’s reflection appear to be less sharp than in the other images; whereas, the first apple’s reflection is in less shadow. My initial understanding of focal plane tells me that the right apple must have been placed a bit further back than the other two.
Over to you Raj.

The detail in the top b&w is much more interesting but I quite like the darker shadows in the second version. They seem to complete less for my attention.
Great point, Susan. Thank you for this perspective.
Thank you for making another post, Brenda! This helps a lot. 🙂
I am having so much fun with these lessons
That’s a really good post about the difference of raw and jpg. Thank you for sharing.
Thank you for visiting and sharing your thoughts
Very interesting post, Brenda. I have never taken any B&W photo with my D750, and I am very curios about that. You’ve answered my question! Thanks.
Every article I read said if we want to a B&W photo, it’s better to take a color one and use an editing program to convert it to B&W.I have a feeling that if you shoot in jpg in color and convert it to B&W in your editing program, your B&W would have more details in it.
Have a wonderful evening.
Helen, thank you. I think this type of exchange is wonderful. I hope you also have a wonderful evening.
Brenda, first of all, sincere apologies for not noticing your contribution. It happened last time also. The reason is you have linked the WordPress reader link, please provide the link you get when you access the WordPress from a browser. When you do it, WordPress notifies me about a link to my post. Anyway thanks for the contribution Brenda. Glad to know that you are participating regularly. It’s the real encouragement to me.
Great experimentation Brenda. Regarding the raw and black and white I will write another comment below for better understanding.
The black and white set: Even with the low resolution/size images you posted I can clearly see the huge difference between the raw and the jpg version. Raw actually has much more details on the skin of the apples. Glad that you chose apples for this experiment as Apple has so many tones of colours. But the large size image would have better justified the outcome.
About the focal plane experiment, at 1.8 your DOF is very shallow and the apples are not in parallel to the camera sensor/lens. That’s why you are seeing the less sharp right apple. Also if you see carefully, the centre apples facing side centre and the left apples stem end are in sharp focus as they are in the perfect focus plane. Shadows don’t have anything to do with focal planes and they can be adjusted in post process. The details camera captures is dependent of the focus and the exposure.
This critical review is part of XDrive’s photography learning sessions. Thanks Brenda for being here.
Raj
Again, your perceptive ability is an amazing gift and your willingness to offer such clarity in your feedback awakens gratitude. I didn’t know the difference between the two different links…will do as you recommend in the future.
I find that I am a bit confused about, “…the large size image would have better justified the outcome.” Would you clarify?
In response to your discussion regarding DOF, I went back to the three apple images and zoomed in on the apple stems…interesting. I’m motivated to so more DOF photo study experiments with the expectation that my eye will be able to pick up the minute variations within different aperture settings.
Thanks Brenda for you kind words.. Yes there is a difference between those two links. Please use the link from the browser instead of the one you got from the wordpress reader.
About large size comment… actually you have posted a small size image and it’s very difficult to judge the quality and details. Please check Helen’s contribution, where she has posted a large size image and we will be able to do comparison better .. that’s what I meant. Sorry about that confusion I created. 🙂
DOF is just a band with certain thinkness where your image will be sharp, this thickness is dependent on the aperture you set. So whatever you want to be sharp should lie within this band thickness. Check this link about that band https://rkarkera.files.wordpress.com/2017/09/dsc00621.jpg?w=496&h=343
Raj, what size image would you recommend for these lessons
There is no rule on the size, larger size helps to analyse deeply that’s all. Generally I feel around 1500 pixels on the longest size should be decent size.
Regarding raw and B&W. I think it is because you have set the camera output as raw and jpg. If you set it as raw only, you will not be able to set the b&w as it’s not applicable for raw shooting. In my understanding raw always shoots in colour and you convert it in camera or in post process. Probably on your LCD(live view) would have shown the b&w image as you compose, because of the jpg format was chosen. The camera will help to visualize how your black and white would look. Please check it and let us know how that works. It’s interesting, I have never done this so far as I shoot only raw.
Hope this clarifies.
I’ve been invested in photography for 40 plus years and am amazed at how much there is to learn. When I set out on a photography walk, my camera is generally set on manual and raw with a monochrome picture control. I did not know that raw images always shoot in color. Since the images in both, the LCD and Nikon’s View NX show my images as monochrome, I “mistakenly” assumed that Capture One’s software magically converted the images from monochrome to color 🙂 blush, blush :), blush, blush :). I’m sure Capture One’s software team would be shaking their heads and doing face palms if they knew of my mistaken attribution. 🙂 blush, blush, blush.
Thank you so much for these lessons and your feedback. I appreciate the time you have invested in these lessons and wish to thank your family for allowing us to have a bit of your time.
Thanks Brenda for your understanding and the appreciation, but in fact, I learnt so many things from you here. I did not even know that one could choose monochrome settings for a raw + jpg.. I feel it would be a great setting to do on a black and white photography mission. This way you know before you shoot how your black and white photo would showup. One can do better settings for the exposure. The exposure setting for colour and monochrome are not the same. Glad that we all learnt something new.. Cheers to you Brenda. 🙂