Today, is one week shy of my year-long photo study project! I began this blogging journey with the intention to explore, experiment, and learn about various aspects of photography.
Through the unparalleled sharing of knowledge Ted Forbes’ offered through his YouTube videos, The Art of Photography, I was able to set out learning about the basics of composition within photography: the rules of thirds, odds, and space; as well as, the elements of lines, shape, simplification, negative space, repeating patterns, sub framing, and triangles. And from this ground work we explored perspective, seeing, low and high angles, tone, color theory, and the characteristics of light.
Sony NEX-5N f/6.3 1/400 186
The genres of abstract, landscape, sequence, contemplative, and street photography were introduced with the assistance of photographers such as:
Four posts ‘focused” on The Photographer, the person who stands on one side of the photography triangle which supported the Developing your Photography Style exercises. These 4 posts were drawn from Ted Forbes’ Master Class Live series in which photographers were offered exercises designed to exhaust all possibilities in order to awaken our unique individuality.
And yes! Throughout the year there were exercises that I undertook with an egg, or two, or three as the subject.
iPad f/1.8 1 sec ISO 64
This was an autodidactic journey undertaken to share and expand through exchanges with others. Each posts defined the next topic throughout this project. It has been both a challenge and fun. You will find each of the post listed as standalone lessons on the home page under A Photo Study.
Was there a specific topic or post that you enjoyed the most, the most beneficial, the most challenging? I would enjoy seeing 1-7 of the images you created during the past year. Let’s tag with #aphotostudy.
Ted Forbes brings his Master Class Live series to a close by identifying a number of important reminders for amateur and professional photographers:
photographs come from your mind, your talent, your skill level, your experience, your sense of creativity….
…what you are as a photographer is a sum of all your experiences and everything you have done up to this point comprises your skill level.
…the camera doesn’t make images you do
Developing your style as a photographer is:
…an ongoing process…this is something that you get better and better and better and better at, and I think, hopefully, one day you get really good at but it never stops….
Exercise 1:tell a story without words
identify a story or how-to-series you would like to create
use your camera to create a series of photographs
use as many perspectives as possible
keep it simple
think about composition, that is how could various elements assist in telling your story
create a lot of images…15-30+
edit the series of images
identify those that specifically show what you are trying to communicate
removing those that are not essential in the story’s key points
edit again to pare the number down to as few as possible.Can you remove all but one and still tell the story?
The absolute goal of this exercise is to tell a story with one image that interacts with a viewer and evokes an emotional response, a reaction, or a change in perspective, thought, or understanding.
A number of various genres that may inspire you are:
…what we’re doing here is getting you to think…over the course of a long period of time you may see some of it very quickly, some of it in a matter of weeks, depending on how hard you work, it may be a couple of years before you start really feeling like you defining yourself as a photographer…the catalyst, which I think is really important…what we are looking for right now…is to get you to start thinking differently…
The first part of this Developing Your Personal Styleseries invited us as photographers to learn how to see and think–visualization. The second encouraged us to utilize the meditative process of concentration and returning to the object as a means to extend our creative endeavors by encouraging us as photographers to “exhaust all possibilities”and “to train the brain to think.”
This week Ted Forbes has offered three separate photo assignments that blend two things together…emulating an identified feeling state of experience and engaging with a subject in such a way as you create a portraiture that represents an identified feeling.
Exercise 1:
Start with a basic feeling…identify an event or something that happened in your life that is associated with a feeling — happy, angry, sad, worried, etc.
Visualize and mediate upon this feeling state.
Get your mind to think differently….how do I bring that certain feeling into an image?How do I just shoot something that represents that state of experience?What do I need to do to get that feeling to be represented in a photograph?
Replicate this feeling through a still life, landscape, or abstract image.
Don’t expect to be good…it takes time to emulating feelings.
The initial photographs we create during this time “…may not be great, but the whole point is [we’ve] got [our heads] thinking and [we’re] getting [our] mind around composition and possibilities and that’s what’s really important…”
This slideshow requires JavaScript.
Exercise 2:
Go to the library or book store and find a photo book of a photographer whose work touches upon the multiple emotions within the human experience; e.g., Cartier-Bresson, Walker Evans.
Ask yourself what is it about this photographer that inspires you to start seeing the varied possibilities of photographing and evoking feelings.
Remember you don’t have to try and be like him…just see the possibilities.
Create a portraiture of someone that demonstrates an identified feeling state.
Engage with your subject, share what feeling state you wish to convey, develop a sense of trust, be like a movie director encouraging an actor to communicate a specific feeling.
Keep in mind
there is discomfort for the viewer when she can not see someone’s eyes.
people communicate emotions all of the time through their facial expressions and body postures.
interacting with people will help increase your comfort level
experiment with how to evoke feelings of people so that in time your work demonstrates your individual touch and people will “want you and no one else.”
This slideshow requires JavaScript.
I hope you will enjoy these challenging exercises that encourages us to stretch our imaginations while creating images that represents your personal style. As always, I’m looking forward to seeing some of your work and reading your thoughts. Let’s tag with #aphotostudy.
This week’s a photo study continues with Ted Forbes’ Master Class series, Developing your own Creative Style.Last week’s blog reviewed and invited us to open ourselves to visualization by remaining in a selected location, without a camera.Within the second episode, he defines meditation and then offers two exercises designed to increase our awareness of mediation within the creative process.
In the world of photography, mindfulness has been described as “meditative” or “contemplative” photography.
While out on a photo walk, my eyes scan the environment, searching for that something (shape, patterns, color, light/shadow, story) that draws my attention or for the perfect background scene.As I move through my environment, my mind begins thinking about a photo article I read earlier or an image created by one of my favorite photographers.I then consider the various camera settings and variations that may help me recreate an image or avoid repeating a past mistake.For a moment or two, I ponder about what kind of image would be a great accompaniment with a particular haiku.I begin composing and designing my next post which then invites me to slip into a fantasy about recognition and praise and then silence an inner smile as unease creeps in with, “Most likely your pictures will not be good enough”
All of this invites me to question, “Am I really on a photo walk or am I engaged in a private screening of movies of my own making?” This mindlessness chatter of thoughts, expectations, and desires are like dense clouds that prevent me from really being present with and seeing the world around me.To see requires a meditative mind.
For some people meditation is shrouded in esoteric mystery.Others understand it through images of a person sitting in the lotus position with eyes half-closed.Others associate it with holiness and spirituality.In its most general sense it is deciding exactly how to focus the mind for a period of time and then doing just that.
In theory, focusing the mind upon an object sounds very easy, but practice acquaints us with a mind that seems to have a will of its own as it drifts from one thought, image, conversation, or memory to other remembrances, conversations, concepts, and thoughts.This internal stream goes on and on like a personal conversation with oneself or a perpetual story upon a movie screen…
…at the point when one realizes that the mind has traveled here and there, one is simply to note this to oneself and with acceptance gently return again to the meditative object…cited: A Meditative Journey, b c koeford
This slideshow requires JavaScript.
Even though they may not specifically use the word “mindfulness,” many of the great masters talk about photography as awareness of the present moment in which we forget ourselves. We let go of the goals, desires, expectations, techniques, and anxieties that make up who we in order to more fully immerse ourselves into the experience of seeing. We open up our receptive awareness to what the world offers us…. We’re not looking for anything in particular. We’re not going anywhere in particular. We’re not expecting or trying to control anything in particular. Instead, we’re wandering, perhaps rather aimlessly, without a goal or purpose. We’re fully and naively open to the possibility of the unexpected, the unique, the moment when things come together… to the flow of life. Under these conditions, when we let go of the self, “it” appears to us. We don’t find and take the picture. The photograph finds us. It takes itself. We unite with the scene not so we can see a shot we want, but rather what the scene offers. The experience comes to us and the photograph is simply the icing on the cake.cited: http://truecenterpublishing.com/photopsy/mindfulness.htm
In photography, mindfulness is like observing something for the first time, even though you may have looked at it a thousand times before.
With an understanding of the importance of returning, again an again, our concentration to the moment, Ted Forbes invites us to
1. Spend 30 minutes to an hour creating a still life.
Use an ordinary everyday item
focus on that one object
exhaust all the possibilities
when you become aware that you mind has begun to wander then—with acceptance—just return to this still life project
ask yourself what am I not doing, what if I introduce motion? what would be different if I would do….? what would this look likein different location—outdoors, on the floor, different table?
if it seems as though all possible angles, ideas, etc., have been exhausted, remain focused on the exercise for the rest of the time by jotting down thoughts and engaging in visualization.
2.Spend 30 minutes to an hour with a building or an outdoor space. — If you have chose a building that is in a public space and not a building that may arouse anxiety, a government building.
sit and explore ways to photograph.
just remember to keep returning to the exercise when you mind begins to wander.
exhaust all possibilities
use your journal to write down your ideas, frustrations, future projects.
This slideshow requires JavaScript.
If you are interested in meditation within the street photography genre, I invite you to visit Keep the Focus website. The Keep the Focus is a project initiated by German Street Photographer Thomas Ludwig who wants to bring the benefits of meditation techniques into street photography. On the site he offers a free ebook. A Meditation Guide for Street Photographers
I enjoy reading your comments and viewing your creative work. Thank you for sharing. Let’s tag with #aphotostudy.
Raj writes in his 16th xdrive photo lesson that contrast, a deviation from the brightest parts of the image to the darkest, is often overlooked during the digital darkroom process. As I read his explanation about low contrast images, it brought to mind those long exposure landscape images that are composed of a single tree or those low contrast images of trees within mist or fog. Dreamy.
applesNikon D750 f/4 0.1s 35mm (prime lens) 100 ISO
In the two images below, I can see in the color image how the contrast highlights the water drops…they seem to glisten within this backlit photograph. While the water drops within the monochrome image are not as noticeable, I like how the reflections of the countertop are reflected in the bowl. The tiny sunburst along the right edge of the bowl is visually interesting.
snowNikon D750 f/5.6 1/125s 300 mm 100 ISO
While I like the warmth of the monochrome image of the apples, I couldn’t seem to create the same atmosphere with the snow photograph. It just may be incongruent to create a warm image of snow?
I prefer the color image which had a bit of editing within Color Effects Pro 4’s green-yellow color contrast presets. The water drop on the tip of the leaf also seems more apparent in the color image.
The low contrast monochrome image (first monochrome image) is not as dramatic as the high contrast (last image). The water drop also seems more apparent in the last image. I also noticed during the digital darkroom process that experimenting with contrast within Color Effects Pro 4 required awareness of how some of the presets darkened the leaves to a degree where the detail was hidden.
Again, thank you Raj for these lessons. I would also like to thank Helen at HHC Blog for bringing to mind the beauty of color contrast within images.
Raj’s xdrive photography lesson lesson for November explored 10 edits that photographers should know about prior to publishing images. My initial submission was of a family walking on a bike path during the golden hour.
Nikon D750 f/7.1 1/160 s 35 mm 400 ISO
Taking a few minutes to review this image in response to Raj’s feedback, I found that it is a bit of a challenge for me to notice the tilting due to 1) the curvature of the pathway as it moves my eyes to the background and 2) the presence of the trees hinders a clear view of the horizon.
In the markup below, my initial horizontal adjustment was the rooftop of the building in the background. Raj noted in his feedback, “we can’t rely on anything man-made as it all depends on the orientation of these things.” The areas I have circled were noted as over and underexposed by Capture One’s high exposure warning.
raw image with markup
adjusted image
first edited image with markup
Raj noted that the image stilled seemed a bit tilted in the image above. He also noted that the edited image is “kind of overexposed” and recommended that I “carefully check woman’s jacket, it looks kind of overexposed.” Also my editing seemed need a bit more saturation.
The image below was cropped with Raj’s recommendation in mind and I find it to be more focused upon the family dynamics. It also brings attention to Raj’s observation regarding the closeness of mother and daughter in comparison to the actions of the two boys. I also did not attempt to lighten the shadow element of the boys as I wanted the image to be about the family.
While the image below seems to address the overexposure Raj noted in the above image, I’m still struggling with this as the histogram (within both Capture One and Photoshop) as well as the Capture One exposure warning does not indicate an overexposure. So do I rely too much on technological guidelines over my vision?
It took me several tries to address the titling…sigh…
In regards to saturation, could the specifications of computer design as well as color calibration variances result in visual differences between what I see–or think I see–on my computer and what other bloggers see? If so, is there a way to address this? Also, I found that I needed to be very careful in regards to saturation as the image tended towards having a yellowish sheen.
All in all I the second edit does seem to be better.
second edit
monochrome images
first monochrome image with markup
When I compare the above initial monochrome image with the one below, I’m able to more easily see areas that may be a bit overexposed. The woman’s jacket has a burned appearance. The detail in the woman’s jacket below offers a bit of resolution to my question above regarding overexposure…it’s about the detail in the woman’s jacket and the girl’s top.
Since the young boy looking towards the camera suggests a message of interaction, I find that I prefer the lightening in the above image when compared to the one below.
second edit
Again, I wish to express my gratitude to Raj and to all those wonderful bloggers who stop by and visit.
A valuable resource for those who have an interest in expanding their understanding of street photography can be found at the Streets of Nuremberg. His intention is to to give back to those who have given him so much by offering a “one stop resource pool” where photographers can find free tips, tutorials, inspirations and everything else.
The above image was created (with a bit of awkward anxiety) using Streets of Nuremberg’s Photography Quick Tip 1 for photographing inconspicuously; that is,
Line up in the general direction of your subject, raise the camera and shoot something behind or above him/her. Absolutely avoid eye contact, best look through the viewfinder of your camera. Bring the camera down, pretending to check the image you just took on the LCD back screen of your camera, your finger still on the shutter, still avoiding any eye contact with your subject. Instead of checking the image you just have taken above or behind your subject, compose your shot with your subject through the LCD back screen of our camera and shoot the “real” picture. Do not (!) check the photograph you’ve just taken, instead raise the camera again and “redo” the first shot behind or above the subject. Repeat as needed. And don’t blush 😉
Over the past couple of months I’ve found that postings of bloggers I follow are not always coming up in my WordPress Reader. One of those missed postings is Raj’s photo lesson on lenses. In that xdrive photo lesson Raj invited us to “really access the capabilities of your camera and find out what exactly is your stumbling block, is it a camera or a lens?”
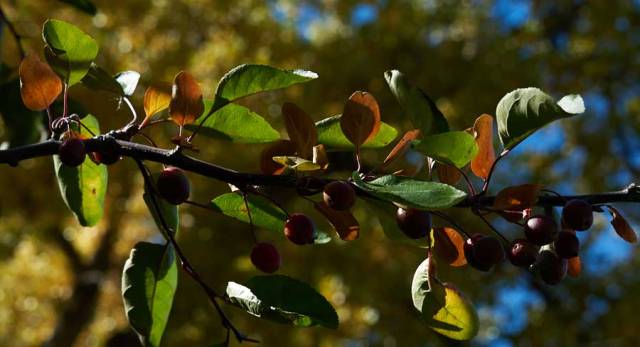
So with this lesson in mind along with the recent discussions about photographing in raw, I set out on three separate nature walks with a different lens on each occasion.
On the first day of this assignment I used a Nikon 28-300mm f/3.5-5.6G ED VR lens with a Tiffen 0.6 neutral density lens.
This first image is a representation of the raw image. I see this image as a bit underexposed.
Nikon D750 f/9 1/40s 55mm ISO 100
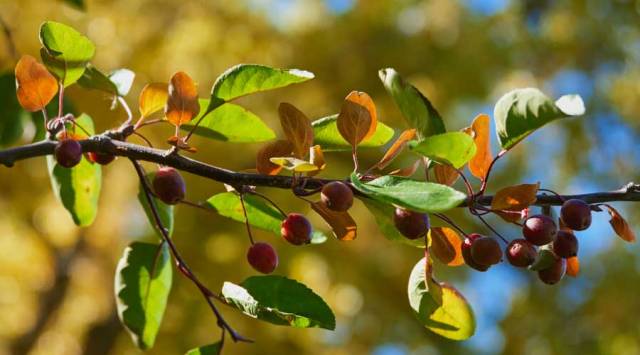
This second image was created with Raj’s discussion regarding the consideration of sharpening and color saturation within the initial editing of raw images in mind.
Nikon D750 f/9 1/40s 55mm ISO 100
While I love bokeh – the way the lens renders out-of-focus points of light – I experimented with opening up the f-stop to explore Raj’s recommendation that an “open aperture would have created better isolation of leaves.”
Nikon D750 f/4.5 1/100s 55mm ISO100
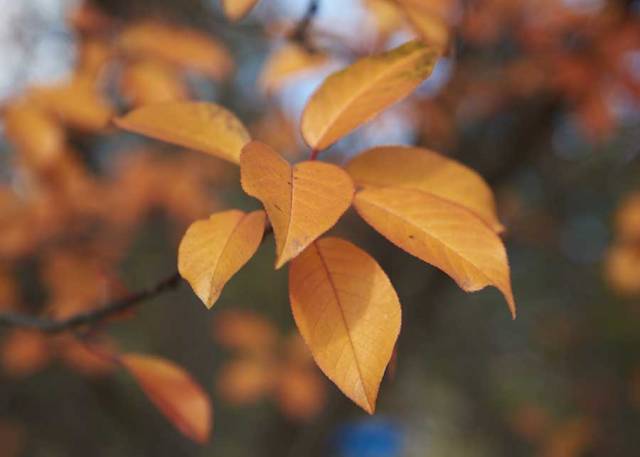
During the second day of this assignment I used a Nikon AF-S DX 35mm f/1.8G lens with a Platinum natural density lens.
The first image is a raw representation prior to any editing. This image seems a bit muted.
Nikon D750 f/1.8 1/1000s 35mm ISO 100
This second image was again edited with the intentional inclusion of sharpening and color saturation. As Raj noted an open aperture does allow for a greater isolation of the leaves. The f/1.8 setting also seems to offer a softness to the image as well as gentle depth of field.
Nikon D750 f/1.8 1/1000s 35mm ISO 100
In my limited experience and knowledge I find that a prime lens invites me to zoom in using my legs which is okay when photographing leaves…but not so much during street photography.
Nikon D750 f/7.1 1/60s 35mm ISO 100
On the third day, I set out with a Nikon AF-S 24-85mm f/3.5-4.5 G ED VR lens.
A raw representation prior to editing. Again, muted.
Nikon D750 f/4.2 1/125s 56mm ISO 100
In the edited f/4.2 image the shadows on the leaves are brought out; yet, I find the background a bit distracting. Sharpening and color saturation was also intentionally included in the editing process.
Nikon D750 f/4.2 1/125s 56mm ISO 100
In the f/7.1 image below the detail and sharpness of the leaves seems to offer a greater isolation of the leaves and isn’t as distracting as in the f/4.2 image. Also, it is interesting to note that both images have a bit of bokeh.
Nikon D750 f/7.1 1/80s 56mm ISO 100
Over to you Raj…I am finding great value in your lessons and feedback. Thank you for expanding my understanding of this never-ending learning experience.


 The absolute goal of this exercise is to tell a story with one image that interacts with a viewer and evokes an emotional response, a reaction, or a change in perspective, thought, or understanding.


You must be logged in to post a comment.